 |
|
|
 |
|
Installation Guidelines
The dimensions of the cubicle and arrangement of the objects at the January 2006 S.M.A.K. exposition of Voorstelling will serve as a reference for future re-installations of the artwork. Regarding the position of the construction in the museum space, it is important for the artist that the construction should not stand independently in the space, without links, but rather that it should become part of the space itself. The visitor should not have the feeling of finding himself in front of an object on exposition in the museum and simply walking around it to observe it. The construction should become part of the museum. For this reason it would be good to use some museum walls to construct the cubicle, and to build some new walls to complete the form.
The entrance to the cubicle’s rooms can be located either on the short side or on the long side. It is important that they should not be located in the same line or hall. To pass from one room to another, the spectator should indeed have to walk around through the museum and not feel the link between the two spaces.
Once the visitor walks out of the first room, he should pass through a more or less longer passage through the museum and finally reach the second entrance, forgetting the connection with the former. This is how the artwork actually ‘melts” with the museum space. The two parts of the cubicle become two independent spaces as if they were two different expositive spaces. The visitor can feel the link between the two rooms only later.
The space solutions proposed for the Van Abbe Museum in 1997 and for the S.M.A.K this year are two good examples. The installation in SMAK in 1999 is not considered by the artist to be even a possible solution for future presentations of Voorstelling.
The public and room A
The arrangement of room A presented in all installations of Voorstelling so far is the only way the artist wants it to be arranged. The five wooden benches have to be placed in front of the “window”, as suggested by the plan.
For the artist it is important to produce some booklets to lay on the benches. They do not have to be fastened to the benches with cords or anything. Visitors could take them home. It is possible to produce a simple paper printed version of the booklets, a cheaper and simpler version than the Van Abbe Museum booklets. The booklet contains the text of Tomatentraum and some other texts not directly related to the piece. It would be nice to translate the texts into English (and thus make English language booklets available).
The public can also go into room B. The visitors can look and walk around. Suchan Kinoshita does not mind if they touch the objects, but they cannot play with them, use them or change their position. It would be a good option to have a written notice of this. This sign could be placed both outside and inside the room - for instance on the table with the coffee maker.
The sign should be worded as follows: “The objects are to be handled only by the ‘spullenbaas’ [boss of the objects], and not by the visitors”.
Room B
The actual arrangement of the objects in the working room are a reference for future installations of the work.
The position of some objects in particular has been fixed by the artist to facilitate the performer’s action.
When these positions have changed at the end of the performance, they have to be reestablished by the performer himself before beginning the “action” once again.
It is possible, however, to change the display of some objects if they are not functional in terms of the performance and if they hamper the action.
The objects that compose this present exhibition of Voorstelling are the definitive set of objects for any future re-installations.
The positions fixed by the artist are marked on the room B plan (layer 5) with the color red.
The position of the curtains on walls 1 and 3 are fixed and have been measured. (See the graphic documentation: curtain diagram). ).
For the arrangement of the objects in space, see paragraph 2.2. Present installation and plans of room B (layers 1, 2, 3, 4, 5).
TECHNICAL ASPECTS OF THE EXHIBITION SPACE: HOW TO CONSTRUCT THE CABIN
The cubicle consists of a structure of wooden beams on which wooden panels are nailed. The construction is painted - but not decorated – with the same color of the surrounding space in order to become an integral part of that space. The ceiling is always closed with wooden panels and then painted white. The cubicle’s floor is not always the same as the floor in the exposition room: wooden panels are placed on the existing floor. The used wood can be of a different kind. The size surveyed during the exposition at the SMAK (2005-2006) - both for the construction and for the position of the objects in room B – can be used as a valid reference for a future re-installation of the work. For the artist, the dimensions used in the exhibition were the right ones.
The dimensions of the rail placed on the ceiling will not allow any variation in the cubicle’s size. The size of the rail and the distance of the rail from the wall are estimated on the basis of the actual size of the construction, and the only possible variation is about 20 cm more in length and width.
THE INSTALLATION OF THE ARTWORK
Installation sequence, room B:
1. building of the cabin
2. building of the floor
3. building of the rail for the box
4. positioning of the box
5. construction of the “window”
6. installation of the electrical system
7. installation of the rail on the ceiling
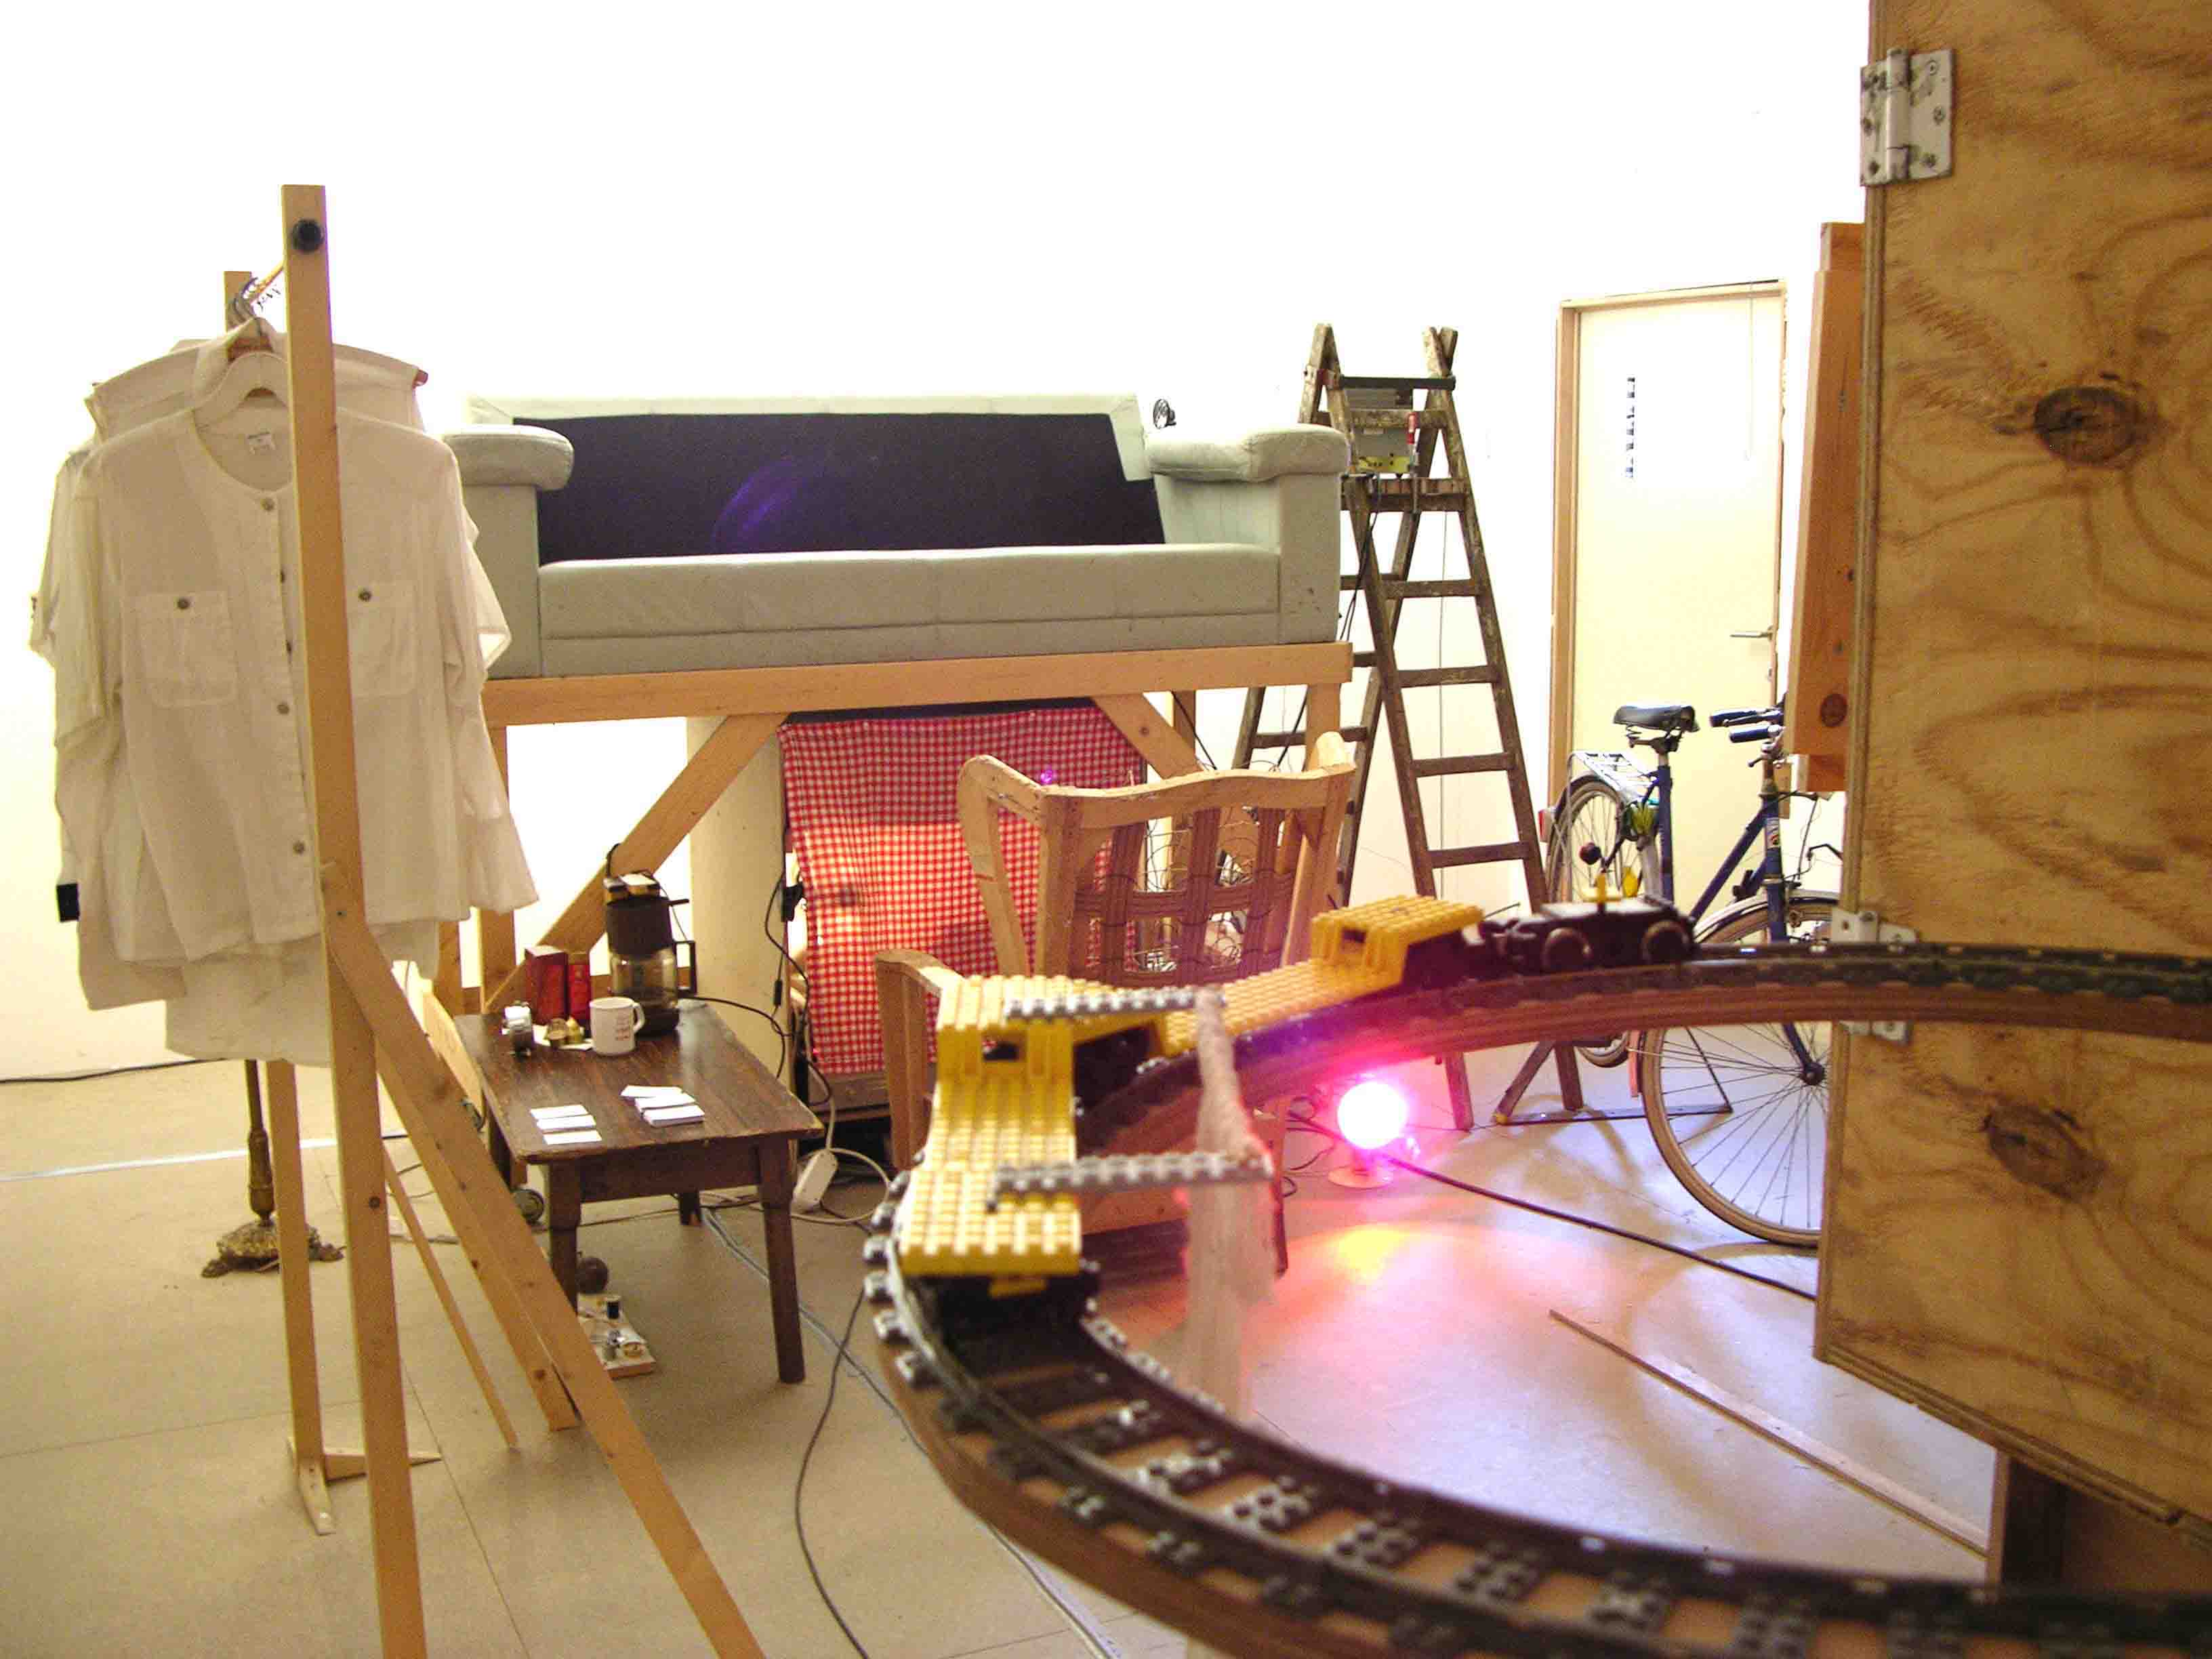
When the construction of the cabin is completely finished (interior walls painted and the floor put in), the rail to move the big box on can be laid. This rail and big box are the first elements that have to be installed in the cabin. The “window” in the cabin must be constructed in conformity with the dimensions of the box’s opening. Before placing all the objects, you have to arrange the electrical system, which must first be fixed on the floor, and then afterwards you can install the rail on the ceiling. Now you should place the objects. It is better to place the big objects first, in order to have the maximum possible space for moving them. To proceed in a sequential way, the objects should be positioned starting from wall 2 and moving to wall 4 (see the diagrams to get oriented in space).
Place from wall 2 to wall 4:
8. window accessories
9. control box with audio and electrical system
10. sofa on the wooden structure
Then place the smaller objects:
11. curtains on the wall
12. windscreen
13. table with words
14. incubator
15. clothes stand with shirts
16. table with coffee maker
17. lamp
18. armchair
19. ladder with TV
20. bicycle
At the end, place all the little objects and accessories.
All objects have a code (see the detailed objects list).
To de-install and pack the objects, proceed in the reverse order. It is advisable first to remove the accessories and the small objects, and then the larger ones, until the room is empty. It is easier to remove the objects nearer the door first.
Installation space, details:
1. The rooms are painted white (inside) and a color similar to that of the museum’s walls (outside).
2. The ceiling must be closed.
3. The construction must have its own floor, which can made of plywood or fiber board panels placed on the museum floor.
4. The entrance is on the long side of the room, though this can be changed. The entrance is normally on the long side of the room, though it can be on the short side, if necessary.
5. Each room has an independent and free entrance.
6. The doors must be open all the time, regardless of whether the performer is absent or present.
7. The cabin must have doors. They can be the ones from this installation.
8. The opening in the door of room B can be closed with the cardboard (object Z1).
9. The box can be moved in the room by means of the rail on the floor, and it can be moved as far as the window.
10. There are three positions for the box on the rail (see the box position diagram).
11. In space C are placed the red curtains, three lamps and two spotlights.
12. There is a small entrance in the wall to get inside space C.
The length and width dimensions of this entrance are indicated in the diagram for general guidelines/measures of Voorstelling.
13. The control box is placed under a wooden structure and above this structure the sofa is placed.
14. The structure under the sofa can be moved on wheels.
15. In the control box you can find the directions for the audio and video systems, as well as for moving the train and the railway.
16. The railway is moved by an engine, which is installed on the ceiling.
17. The positions of some objects are fixed. All the positions are indicated in the diagram of the space (layers 1, 2, 3).
18. There is a diagram of the electrical system.
Room lighting and sound
We measured the light and sound levels and determined which levels are suitable for the presentation of the installation and that the performer has to use during his action.
The sound decibels were measured with a Sound Level Meter (DVM 805 VELLEMAN), a machine with electrical calibration and an internal oscillator measuring the level range of 30 – 130 dB and the frequency range of 31.5 Hz – 8 KHz. The decibel measurements were recorded for the different sound levels used during the performance. We measured the sound produced by the different objects present in the room, including the sound amplified by the contact-microphones. The lux levels were measured with an appropriate machine (Broncolor FCC) placed close to the source. These light levels were measured at 100% capacity. We also recorded the sound in order to have a sample (recorded with a portable min-idisc Sony digital mega bass, Mz – R35, 6V, registration archive S.M.A.K.).
Sound levels
Object dB
bicycle 50% 75
projector 50% 68
wheel box 70% 70
train 50% - 70% 60 – 70
Radio (on) 65
coffee maker 50% 75
Light levels
Objects Lux
big spotlight, sofa 49000
small spotlight, sofa 50400
red curtain 80
Spotlight, space C 1250
Incubator 6800
The light bulbs that are not 100W are to be changed in accordance with the artist’s instructions. Inside the exposition space, 100W bulbs should be used.
 Copyright Protected Copyright Protected
|